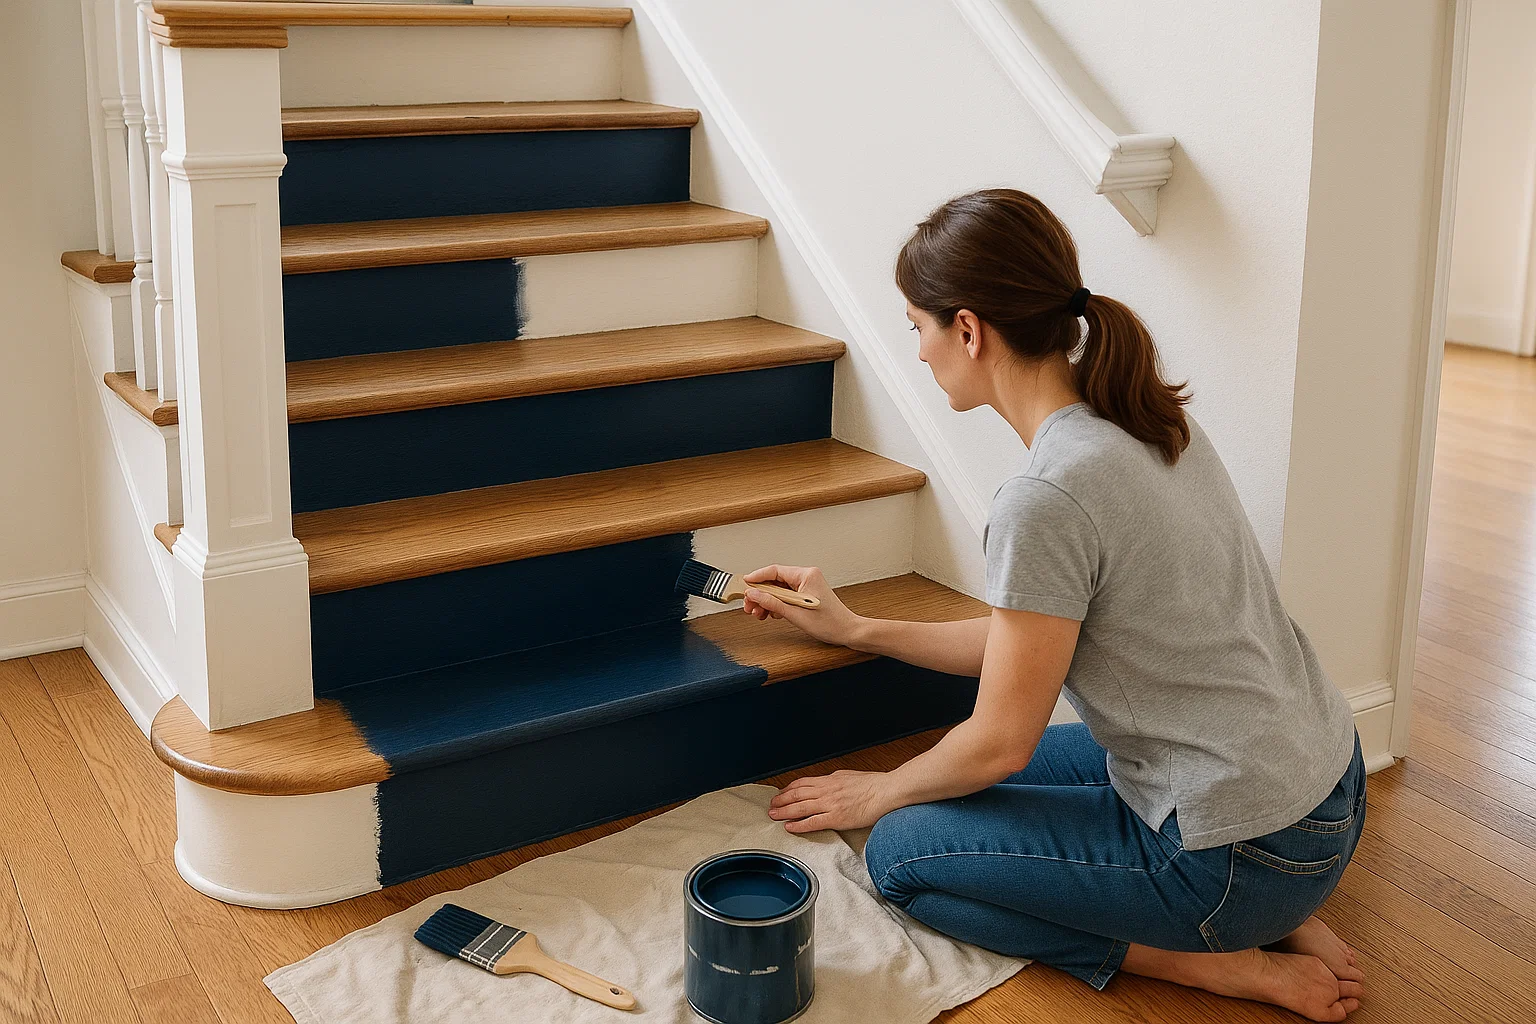
Your staircase is one of the first things guests notice when they enter your home. While new treads and railings can be costly, giving your stair risers a fresh coat of paint is a budget‑friendly way to make a big impact. Painted risers can add color, pattern, or a modern twist without replacing any wood. This guide will walk you through everything—from design ideas to detailed steps—so you can transform your staircase into a beautiful focal point.
Why Focus on Stair Risers?
Stair risers are the vertical boards between each step. Most people overlook them, yet they offer a perfect canvas for creativity. Painting risers can:
- Draw the eye upward, making your entryway feel taller.
- Introduce a splash of color or pattern, turning a neutral staircase into a showpiece.
- Protect against scuffs from shoes and moving furniture.
- Refresh the look without replacing stairs, saving money and effort.
Choosing Your Style
Before you pick up a brush, decide what look you want:
- Solid Color Pop
A single bold color on risers contrasts with neutral treads for a modern feel. Think navy risers with white steps, or charcoal risers with light wood treads. - Two‑Tone Contrast
Paint risers one color and handrails or spindles another. For example, muted gray risers paired with matte black spindles creates a chic, coordinated look. - Pattern Play
Use stencils or painter’s tape to create stripes, chevrons, or trellis patterns. This works well in kids’ homes or eclectic interiors. - Ombre or Gradient
Fade from dark at the bottom riser to light at the top. This subtle effect adds depth and drama. - Accent Words or Numbers
Stencil house numbers, inspirational words, or simple graphics (like arrows) on each riser for a playful twist.
Sketch your idea on paper or use painter’s tape on the floor to preview the effect before committing to paint.
Tools & Materials You’ll Need
- Degreasing Cleaner (mild soap or TSP solution)
- Fine‑Grit Sandpaper (120–220 grit)
- Quality Primer (stain‑blocking, adhesion‑promoting)
- Interior Paint (semi‑gloss or satin for easy cleaning)
- Angled and Flat Brushes (¼”–1″ for edges, 2″–3″ for broad strokes)
- Mini Roller (for smooth, even coats)
- Painter’s Tape (wide and narrow)
- Drop Cloths or Plastic Sheeting
- Wood Filler (for cracks or nail holes)
- Putty Knife
- Measuring Tape and Pencil
- Level or Straightedge
- Clean Cloths
Preparation: The Key to a Lasting Finish
Good prep work makes painting faster and ensures your risers stay chip‑free.
1. Clear and Protect
Remove loose items, shoes, or runners from the staircase. Lay drop cloths on the treads and surrounding floor. Use painter’s tape to mask off the edges of each tread, wall, and railing.
2. Clean the Surface
Wipe every riser with a damp cloth and a mild cleaner to remove dust, grease, and fingerprints. Let dry completely.
3. Repair Imperfections
Inspect each riser for dents, cracks, or holes. Fill these with wood filler, smooth with a putty knife, and let dry. Lightly sand the patched areas until they’re flush with the surrounding wood.
4. Sand for “Tooth”
Lightly sand all risers with fine‑grit sandpaper. This dulls the old finish and gives primer something to grip. Wipe off dust with a tack cloth.
Priming: Setting the Foundation
Primer seals wood, blocks old stains, and helps paint adhere.
- Choose the Right Primer: A water‑based, stain‑blocking primer works well on stairs.
- Apply Evenly: Use a small brush to cut in around edges, then a mini roller to cover each riser. Aim for a thin, even coat—too thick can drip.
- Dry Time: Follow the primer label, usually 2–4 hours before painting.
Painting: Bring Your Design to Life
1. First Coat
Stir your paint thoroughly. Cut in along the edges of each riser with an angled brush, then use the roller for the center. Work from the top riser down to avoid stepping on wet paint.
2. Inspect and Sand Lightly
Once the first coat is dry (check the label for drying time), lightly sand with very fine paper (220 grit). This knocks down any brush marks and ensures a smooth second coat. Wipe away dust.
3. Second Coat
Apply the second coat just like the first: brush edges, then roll. Most colors require two coats for full coverage and depth.
4. Patterns or Details (If Using)
If you’re adding stripes, stencils, or another pattern, use painter’s tape or the stencil after the base color has dried fully. Lightly tap paint onto the design with a stencil brush or small roller. Remove tape or stencil carefully before paint fully cures to avoid peeling edges.
Drying & Curing
- Light Traffic: Wait at least 8 hours before stepping on the bottom riser.
- Full Cure: Allow 24–48 hours before replacing any runners or moving furniture. Semi‑gloss paint often cures faster; check your paint’s instructions.
Tips for a Professional Finish
- Keep a “Wet Edge”: Work on one riser at a time to avoid lap marks.
- Maintain Bright Lighting: Good light helps you see drips or missed spots.
- Use Quality Paint: Cheap paint may require extra coats and can chip more easily.
- Extend Handles: Attach brush handles to PVC pipe or a dowel to reach awkward angles without kneeling.
- Clean Brushes Immediately: Warm soapy water for water‑based paints keeps bristles in top shape.
Maintenance and Touch‑Ups
Painted risers will withstand regular foot traffic, but accidents happen:
- Keep Leftover Paint: Store a small amount for future touch‑ups.
- Gentle Cleaning: Wipe scuffs with a damp cloth and mild cleaner. Avoid harsh chemicals.
- Annual Check: Inspect for chips or wear and touch up as needed to keep your stairs looking fresh.
Final Thoughts: A High‑Impact, Low‑Cost Upgrade
Painting stair risers is an easy weekend project that yields a dramatic transformation. Whether you choose a solid accent color, intricate pattern, or playful stencil, the key steps—prep, prime, paint, and protect—remain the same. By following this guide, you’ll create a staircase that welcomes guests and reflects your personal style without a major renovation.
Ready to revamp your stairs? Gather your supplies, carve out a day or two, and watch your entryway become a true statement piece. For expert advice, color-matching help, or professional painting services, Paint Top Tier is here to guide you every step of the way. Visit PaintTopTier.com to learn more or schedule a consultation!